Introduction 🌟
Let's build a new app 📱 using React Native & Expo. Our app will help users convert currency 💵 from USD 🇺🇲 to VND 🇻🇳.
Features 🎯🥇🏆
- [ ] User sees instructions advising them what to do.
- [ ] User can input data to our application via a
TextInput. - [ ] User can see a placeholder text in the input indicating an expected value to be entered by the user.
- [ ] User can only enter numbers into the input.
- [ ] User can see centered text in the input.
- [ ] User can see two buttons indicating:
- VND to USD
- USD to VND
- [ ] User can see a prompt showing the current value they've entered.
- [ ] User can see a prompt showing the current value's converted value.
- [ ] User can see both values formatted correctly for the currencies region.
- [ ] User can switch from VND to USD or USD to VND.
Learning Objectives ✍️📚📝
- Learn more about passing props.
- Recognize we can pass many different props to components. These props can be of many different datatypes 🍚🥦🍗🌶. Types include
String,Boolean,Object, and,Function.
- Recognize we can pass many different props to components. These props can be of many different datatypes 🍚🥦🍗🌶. Types include
- Learn how to build our own components which consume props.
- Recognize that the components we get for free from libraries 📚 work just like the ones we build 👷🏗️🏭.
- Learn how to compose our functional components with internal functions.
- Recognize that a well written 📝⚖️ component is composed of many smaller parts which encapsulate logic. These parts all work together ♻️.
- Learn how to useState() in our applications.
- Recognize that stateful applications are how we add dynamic 🔀 & engaging 🌠 behavior.
- Learn that we can have our code watch 🔍 for user events within our components ⚙️.
- Recognize that we need to listen for key user 👨💻 events 📸.
TouchableOpacityand the proponPresswill be an important one.
- Recognize that we need to listen for key user 👨💻 events 📸.
Tip 💡: As we move forward we'll have smaller and smaller code snippets. We do this to encourage you to think about what the code does and where it is it needs to go.
Create a new application using what we learned last week. This knowledge gives us a sky 🛫🌤️ of possibilities.
A) Use expo init 9.2-CurrencyConverter to generate a new project. Remember, it contains many folders 📂 and files 📑. Afterwards start the simulator.
B) Edit the placeholder for App to add some instructions for the user on how to use our app.
return (
  <View style={styles.container}>
    <Text>Please enter the value of the currency you want to convert</Text>
  </View>
);
C) Now let's add a TextInput to the same View, so the user can input the amount of currency they'll need to change. Don't forget to import TextInput at the top of App.js. We'll add the TextInput below the instruction text from the previous sub-step.
<View style={styles.container}>
  <Text>Please enter the value of the currency you want to convert</Text>
  <TextInput />
</View>
Different Styles 💋👔⌨
If a component contains no children you can close them with a />.
Non self closing
<View style={styles.container}>
  <Text>Please enter the value of the currency you want to convert</Text>
  <TextInput />
</View>
Self closing
<View style={styles.container}>
  <Text>Please enter the value of the currency you want to convert</Text>
  <TextInput />
</View>
We nested the TextInput inside of the View below the Text, but we don't see anything. That's because we need to add a prop to the TextInput component.
E) Pass a style 💅 prop.
<TextInput
  style={{
    height: 60,
    padding: 5,
    width: 300,
    fontSize: 35,
    borderWidth: 1,
    borderColor: "lightblue",
  }}
/>
F) Now enable your simulator's Keyboard.
Tip 💡: We need to account for the keyboard in the layout when building for mobile. Failing to do this can be deadly ☠️❗🚫.
G) Everything's bunched at the bottom. There's a lot of wasted space at the top. Move everything toward the top by updating the styles at the bottom of the file.
const styles = StyleSheet.create({
  container: {
    flex: 1,
    marginTop: 50,
    alignItems: "center",
    justifyContent: "flex-start",
  },
});
Here we're using flexbox to position things. Learn more here. Here's a more detailed explanation.
Everything starts at the top of the screen now. Nice.
H) Since were building a currency converter, it would be appropriate that the user should only be able to enter numbers. Pass the TextInput a new prop which makes the keyboard numpad type. You can find all the keyboard types documented at https://facebook.github.io/react-native/docs/textinput#keyboardtype.
<TextInput keyboardType="number-pad" />
I) Last polish step: right now our user must tap on the text input when they first open the app. Let's make that automatic for our users by adding the autoFocus prop.
<TextInput autoFocus={true} />
We should now see the TextInput focus immediately. The keyboard should also reveal.
J) Center the text in the input so it looks better.
<TextInput textAlign="center" />
K) Let's add a placeholder prop as well to be super explicit to the user on our expectations.
<TextInput placeholder="100,000,000 VND" />
L) Choose a custom color for the cursor. Add the prop selectionColor.
<TextInput selectionColor="red" />
If your screen looks like this then good work. We indicated to the user what we want. We've also made some sensible decisions in terms of user experience. The TextInput component is auto focused, the keyboard is of type Number, the placeholder is a value which shows an appropriate input.
All of this is the result of the props we passed to TextInput.
<TextInput
  autoFocus
  textAlign="center"
  selectionColor="red"
  keyboardType="number-pad"
  placeholder="100,000,000 VND"
  // more to come!
/>
Key Points 🔑📝
- There is a
TextInputcomponent provided from React Native. - There are many different properties we can pass
TextInput. The properties can be of datatypeString,Boolean,Object, and spoiler,Function.
Let's create a component which highlights the from and to currencies. It will also handle the user choosing between which currencies to convert. I advise we create a component because we want to reuse the logic which handle this behavior for multiple conversion types.
A) Import a TouchableOpacity component from React Native, which is a slightly more advanced version of a Button.
import { TouchableOpacity } from "react-native";
B) Let's go ahead and add some style to the TouchableOpacity component.
const styles = StyleSheet.create({
  button: {
    height: 35,
    width: 200,
    margin: 10,
    borderWidth: 2,
    borderRadius: 20,
    alignItems: "center",
    borderColor: "lightblue",
    justifyContent: "center",
  },
});
C) Now define the component above the App component.
const ConversionTypeButton = () => {
  return (
    <TouchableOpacity style={styles.button}>
      <Text>VND to USD</Text>
    </TouchableOpacity>
  );
};
D) Nest the ConversionTypeButton component in the body of our App components body.
return (
  <View style={styles.container}>
    <ConversionTypeButton />
  </View>
);
We can see a VND to USD button now. This one will handle VND to USD conversion for the user. Now we need to do the same thing for USD to VND. Nest another ConversionTypeButton component in the body of the return.
E) Add a second ConversionTypeButton for USD to VND
return (
  <View style={styles.container}>
    <ConversionTypeButton />
    <ConversionTypeButton />
  </View>
);
We have two buttons but we have a problem ☠️❗🚫. The buttons say the exact same thing. That's not what we want.
How can we fix this
We can fix this by applying a concept we learned last week. We can pass props to our component.
D) Pass two new props from & to to our ConversionTypeButton component when we nest it in the body of App. Contemplate the value of these properties.
How are they the same. How are they different?
return (
  <View style={styles.container}>
    <ConversionTypeButton to="usd" from="vnd" />
    <ConversionTypeButton to="vnd" from="usd" />
  </View>
);
Now we've got two props passed to our ConversionTypeButton. That isn't enough though. The component needs to be smarter.
E) Refactor ConversionTypeButton to behave correctly based on these new props, to & from.
The result is the component rendering the appropriate flags based on the props sent to it.
const ConversionTypeButton = (props) => {
  const fromFlag = props.from === "usd" ? "🇺🇲" : "🇻🇳";
  const toFlag = props.to === "usd" ? "🇺🇲" : "🇻🇳";
  return (
    <TouchableOpacity style={styles.button}>
      <Text>
        {fromFlag} to {toFlag}
      </Text>
    </TouchableOpacity>
  );
};
We should now see our buttons render with the appropriate flags. Nice.
Different Styles 💋👔⌨
Here's a couple different ways we could have refactored if conditional means we dont repeat the ternary. However, we have to define the toFlag and fromFlag twice. Which one do you like and why?
Option 1
const ConversionTypeButton = ({ from, to }) => {
  const fromFlag = from === "usd" ? "🇺🇲" : "🇻🇳";
  const toFlag = to === "usd" ? "🇺🇲" : "🇻🇳";
  return (
    <TouchableOpacity style={styles.button}>
      <Text>
        {fromFlag} to {toFlag}
      </Text>
    </TouchableOpacity>
  );
};
Option 2
const ConversionTypeButton = ({ from, to }) => {
  let toFlag;
  let fromFlag;

  if (from === "usd") {
    toFlag = "🇻🇳";
    fromFlag = "🇺🇲";
  } else {
    toFlag = "🇺🇲";
    fromFlag = "🇻🇳";
  }

  return (
    <TouchableOpacity style={styles.button}>
      <Text>
        {fromFlag} to {toFlag}
      </Text>
    </TouchableOpacity>
  );
};
F) Add the two prompts and values below what we have so far.
We need to help the user understand what the input and conversion values are as well as which is which. This is how they'll know which number represents which value, from or to.
- First lets add a new style to the bottom.
const styles = StyleSheet.create({
  currencyText: {
    fontSize: 30,
    color: "green",
    fontWeight: "bold",
  },
});
- Now let's add some components & styles of the correct composition to the body of the return from
App.
return (
  <View>
    <Text>Current currency:</Text>
    <Text style={styles.currencyText}>0.00</Text>
    <Text>Conversion currenecy:</Text>
    <Text style={styles.currencyText}>0.00</Text>
  </View>
);
We should see the two prompts above the two from & to now.
Key Points 🔑📝
TextInput&TouchableOpacityaree components provided for free. We will use them often.TextInput&TouchableOpacitytake astyleprop like most components we'll use.- Creating components help us reuse logic. Consider the
ConversionTypeButtoncomponent we created. - We can pass our components props like we did for
TextInput&TouchableOpacity. Consider thefromandtoprops we passed toConversionTypeButton. - The props given to a component determine how the components will behave. Contemplate how
ConversionTypeButtonshows different flags becaused of the different props.
One of the most important concepts in React is state. There have been many ways to handle state developed over the years. We'll use hooks in our class.
State will allow us to encapsulate logic into our applications from whether or not a user is signed in, if we have movies to show, or what currency a user wants to convert from & to.
State can represent anything we can imagine.
A) Add a new piece of state to the app, currentCurrencyValue.
- Grab two new dependencies from React,
useState&useEffect. These two functions are introduced to handle state.
import React, { useState, useEffect } from "react";
- Use state in the body of the
Appcomponent's definition. Call the functionuseStatewith an argument of0.- The return value of this function call is an array.
- We need the first two items in the array,
currentCurrencyValue&setFromCurrencyValue. - The
0is the initial value ofcurrentCurrencyValue. setFromCurrencyValueis how we'll update the variable.
This is how we'll get access state in our app. We define the name of the variable, the initial value, and the setter method in one line. This all comes from a function call to useState
const [currentCurrencyValue, setFromCurrencyValue] = useState(0);
- Add the
currentCurrencyValuevariable we just got from theuseStatefunction call to our return.
<Text style={styles.currencyText}>{currentCurrencyValue}</Text>
You should now see a 0 underneath ‘Current currency'
B) Implement current currency updating.
Pass as a new property to our TextInput component. The value is the second index value from the array we get from useState.
<TextInput
  onChangeText={setFromCurrencyValue}
>
We should now see that the current currency value follows that of the TextInput.
C) We need to do the same thing for the converted currencies value. Follow the same steps to have access to a new piece of state. We'll call this variable convertedCurrencyValue.
const [convertedCurrencyValue, setConvertedValue] = useState(0);
<Text style={styles.currencyText}>{convertedCurrencyValue}</Text>
We should now see a 0 underneath ‘Convesion Currency'. However, if you look closely, when the user enters 100,000 VND, the converted currency value does not change.
D) Implement converted currency behaving as expected from VND to USD.
- Define a new function,
convertCurrency, in the body of ourAppcomponent.
This function will look at the state of our app, specifically the currentCurrencyValue value, then decide by 23000. This is the calculation to convert from VND to USD.
const convertCurrency = () => {
  setConvertedValue(currentCurrencyValue / 23000);
};
- Use the
useEffecthook provided by React inApp's body as well. Pass it the function we want to run in the event of a state change, the one we just defined,convertCurrency.
useEffect(convertCurrency);
We should now see that the current and conversion values change.
Key Points 🔑📝
- We will represent real world concepts in our apps using
state. - We can access state in React via a call to the function
useState. - The argument to
useState's call is the initial value of the variable. - The return value of
useStateis an array. The first index of the array is the variable we get, the second is thesetterfunction.
Lets get the currency formatted, button highlighted if it's the current conversion type, and flags showing
A) Add two new pieces of state, toCurrency & fromCurrency. These values will represent which currencies the user wants to exchange from & to respectively.
const [toCurrency, setToCurrency] = useState("usd");
const [fromCurrency, setFromCurrency] = useState("vnd");
B) Define a new function which will handle the user changing the conversion they want to make.
const setConversionCurrencies = (from, to) => {
  setToCurrency(to);
  setFromCurrency(from);
};
C) Pass these values to our ConversionTypeButton component as props.
<ConversionTypeButton
  toCurrency={toCurrency}
  fromCurrency={fromCurrency}
  setConversionCurrencies={setConversionCurrencies}
/>
D) Refactor our ConversionTypeButton component. Implement it to look at the fromCurrency and toCurrency props passed to it and to behave accordingly.
- Style button based on comparsions of it's
to&fromprops to it'sfromCurrencyandtoCurrencyprops. This will result in the button having a blue background if it's conversion type is that of the current state. - Pass the style,
buttonStyle, as the second element in an array passed to thestyleprop ofTouchableOpacity. - Forward the
setConversionCurrenciesprop we sent toConversionTypeButtonas a prop to it'sonPress. This will allow to use to change which conversion they want to make. We also need to pass this function call two arguments,from&to.
const ConversionTypeButton = (props) => {
  const backgroundColor =
    props.fromCurrency === props.from && props.toCurrency === props.to
      ? "lightblue"
      : null;
  const buttonStyle = { backgroundColor: backgroundColor };

  const fromFlag = props.from === "usd" ? "🇺🇸" : "🇻🇳";
  const toFlag = props.to === "usd" ? "🇺🇸" : "🇻🇳";

  return (
    <TouchableOpacity
      style={[styles.button, buttonStyle]}
      onPress={() => props.setConversionCurrencies(props.from, props.to)}
    >
      <Text style={styles.buttonText}>
        {fromFlag} to {toFlag}
      </Text>
    </TouchableOpacity>
  );
};
Different Styles 💋👔⌨
ES6 destructuring is the authors preferred method of writing this code.
Better
const ConversionTypeButton = ({
  fromCurrency,
  toCurrency,
  from,
  to,
  setConversionCurrencies,
}) => {
  const backgroundColor =
    fromCurrency === from && toCurrency === to ? "lightblue" : null;
  const buttonStyle = { backgroundColor: backgroundColor };

  const fromFlag = from === "usd" ? "🇺🇸" : "🇻🇳";
  const toFlag = to === "usd" ? "🇺🇸" : "🇻🇳";

  return (
    <TouchableOpacity
      style={[styles.button, buttonStyle]}
      onPress={() => setConversionCurrencies(from, to)}
    >
      <Text style={styles.buttonText}>
        {fromFlag} to {toFlag}
      </Text>
    </TouchableOpacity>
  );
};
Best
const ConversionTypeButton = ({
  to,
  from,
  toCurrency,
  fromCurrency,
  setConversionCurrencies,
}) => {
  const isSelectedConversionType = fromCurrency === from && toCurrency === to;
  const backgroundColor = isSelectedConversionType ? "lightblue" : null;
  const conditionalButtonStyle = { backgroundColor };

  const fromFlag = from === "usd" ? "🇺🇸" : "🇻🇳";
  const toFlag = to === "usd" ? "🇺🇸" : "🇻🇳";

  return (
    <TouchableOpacity
      style={[styles.button, conditionalButtonStyle]}
      onPress={() => setConversionCurrencies(from, to)}
    >
      <Text style={styles.buttonText}>
        {fromFlag} to {toFlag}
      </Text>
    </TouchableOpacity>
  );
};
E) Refactor our convertCurrency function to behave according to the current state of the applications fromCurrency value. If the fromCurrency is VND we divide by 23,000, else, we multiply by 23,000. Computer Science!
Afterwards, we call the function we got for free setConvertedValue with the argument of the new converted currenciees value.
const convertCurrency = () => {
  let value;
  if (fromCurrency === "vnd") {
    value = currentCurrencyValue / 23000;
  } else {
    value = 23000 * currentCurrencyValue;
  }
  setConvertedValue(value);
};
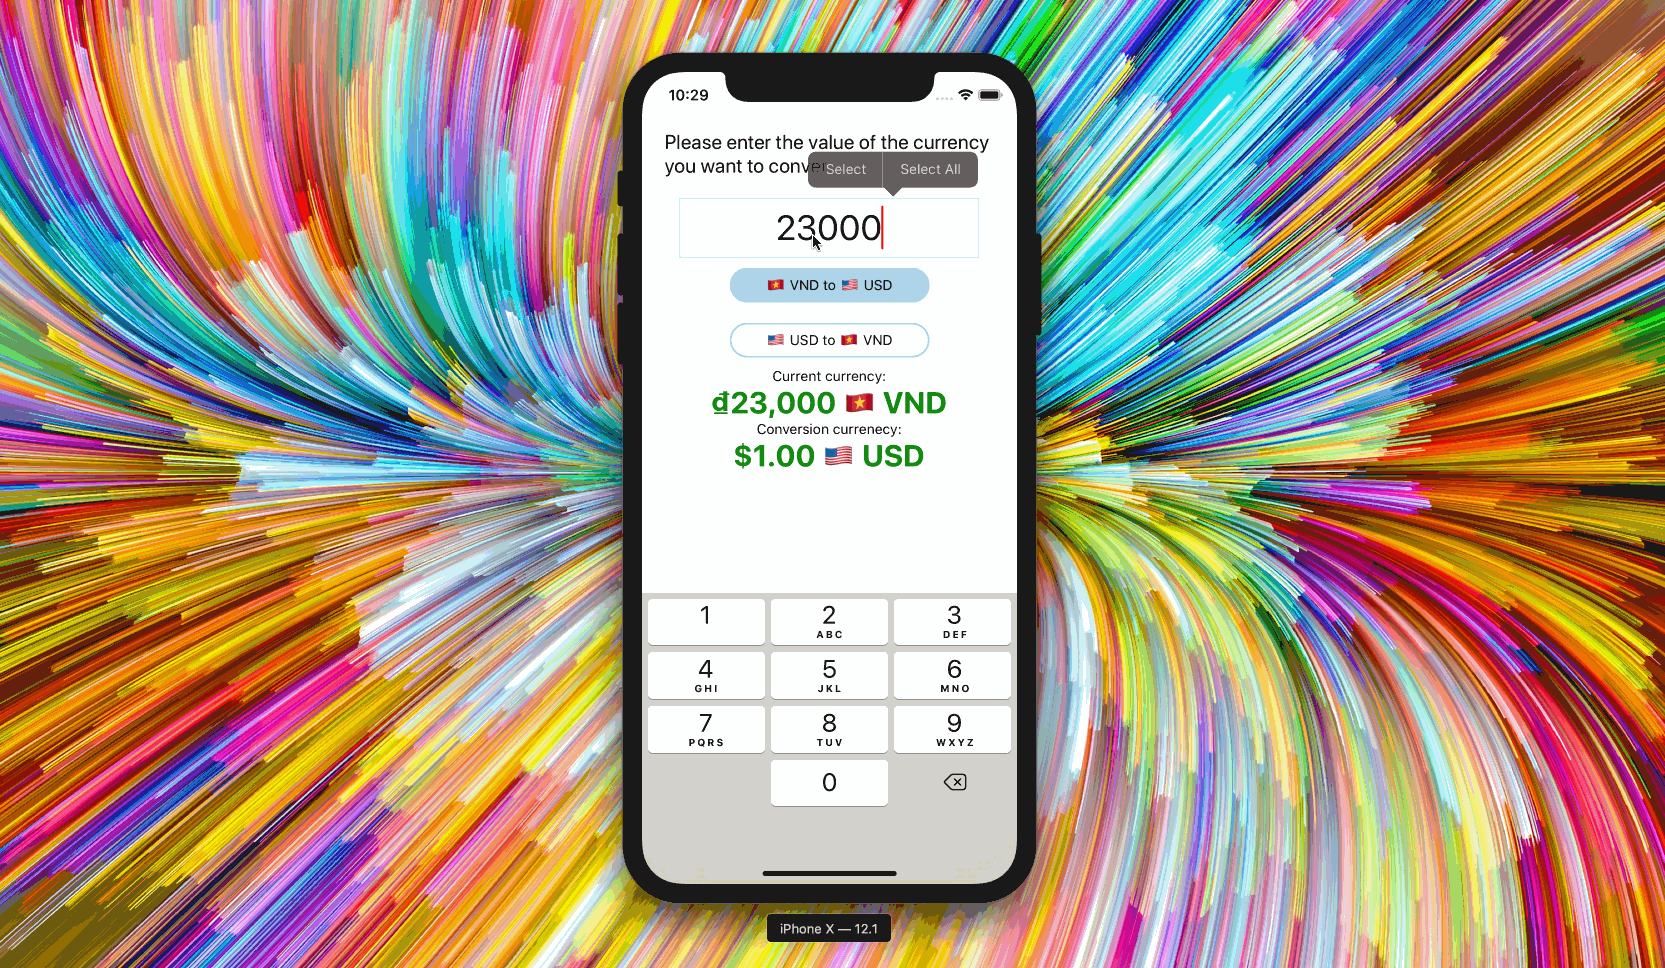
The app should behave like this now.
F) Add appropriate formatting for currency.
Create a new component FormattedCurrency. Contemplate the data this component needs and how it should both get & consume it for a moment before moving on.
const FormattedCurrency = (props) => {
  const format = props.type === "usd" ? "us" : "vn";
  const currency = props.type === "usd" ? "USD" : "VND";
  const flag = props.type === "usd" ? "🇺🇸" : "🇻🇳";

  const formatter = new Intl.NumberFormat(format, {
    currency,
    style: "currency",
  });

  return (
    <Text style={styles.currencyText}>
      {formatter.format(props.value)} {flag}
    </Text>
  );
};
G) Add FormattedCurrency to the body of App's return.
<Text>
  Current currency:
</Text>
<FormattedCurrency
  type={fromCurrency}
  value={currentCurrencyValue}
/>
<Text>
  Conversion currenecy:
</Text>
<FormattedCurrency
  type={toCurrency}
  value={convertedCurrencyValue}
/>
We used a new datatype of Intl.NumberFormat to help us get the correct formatting. We did so by creating a new component FormattedCurrency which took two props type & value. In the body of the component definition we used these props to get our component to render accordingly.
Everything should be working now. Excellent!
Key Points 🔑📝
- Adding state to our application adds dynamic behavior. We can change the state of the application by using state. In this case we changed the state of which currency the user wants to convert
from&to. - Our components can be composed of many smaller functions which help us to branch behavior. Consider the
convertCurrency&setConversionCurrenciesfunctions we defined within the body of theAppcomponent.
- All components require some properties. The properties will be of many different shapes, many different data types 🍚🥦🍗🌶.
- We can build 🏗👷our own components to take props easily. These props will influence our component's behavior. Some of the props we passed were:
to="vnd"from="usd"toCurrency={toCurrency}fromCurrency={fromCurrency}setConversionCurrencies={setConversionCurrencies}type={fromCurrency}value={currentCurrencyValue}
- We can add state to our application if we're familiar with
useState.useStateis a function.- The return value is an array
useState('Hello World')would result in'Hello World'being the default state.- The first index is the state variable.
- The second is known as a
setterfunction/method.
useEffect()is used to apply state changes.- In other words, run this code after state has changed.
Accomplishments 🥇🏆💯
- [x] User sees instructions advising them what to do
- [x] User can input data to our application, hint,
TextInput - [x] User can see a placeholder text in the input indicating an expected value to be entered by the user
- [x] User can only enter numbers into the input
- [x] User can see centered text in the input
- [x] User can see two buttons indicating
- VND to USD
- USD to VND
- [x] User can see a prompt showing the current value they've entered
- [x] User can see a prompt showing the current value's converted value
- [x] User can see both values formatted correctly for the currencies region.
- [x] User can switch from VND to USD or USD to VND
Rockets 🚀
- [ ] User can convert from USD to EURO.
- [ ] User can convert from EURO to USD.
- [ ] User can convert from VND to EURO.
- [ ] User can convert from EURO to VND.