What we'll learn
- Adding Javascript to our website
- Practice DOM method
Requirement :
- 80% completion to pass
- Create 1 github repo with this EXACT structure
|- week2-thursday/
  |-- index.html
  |-- style.css
  |-- script.js
- All today question in tuesday.js file only
- Deploy this to netlify
Set up
- Coppy
index,style, andscriptfrom this repo to your code structure - NOT CLONE
- Organize your code so that it's easy to read and review.
Demo
Box by box, we build
We're gonna build a beautiful dynamic web app today. 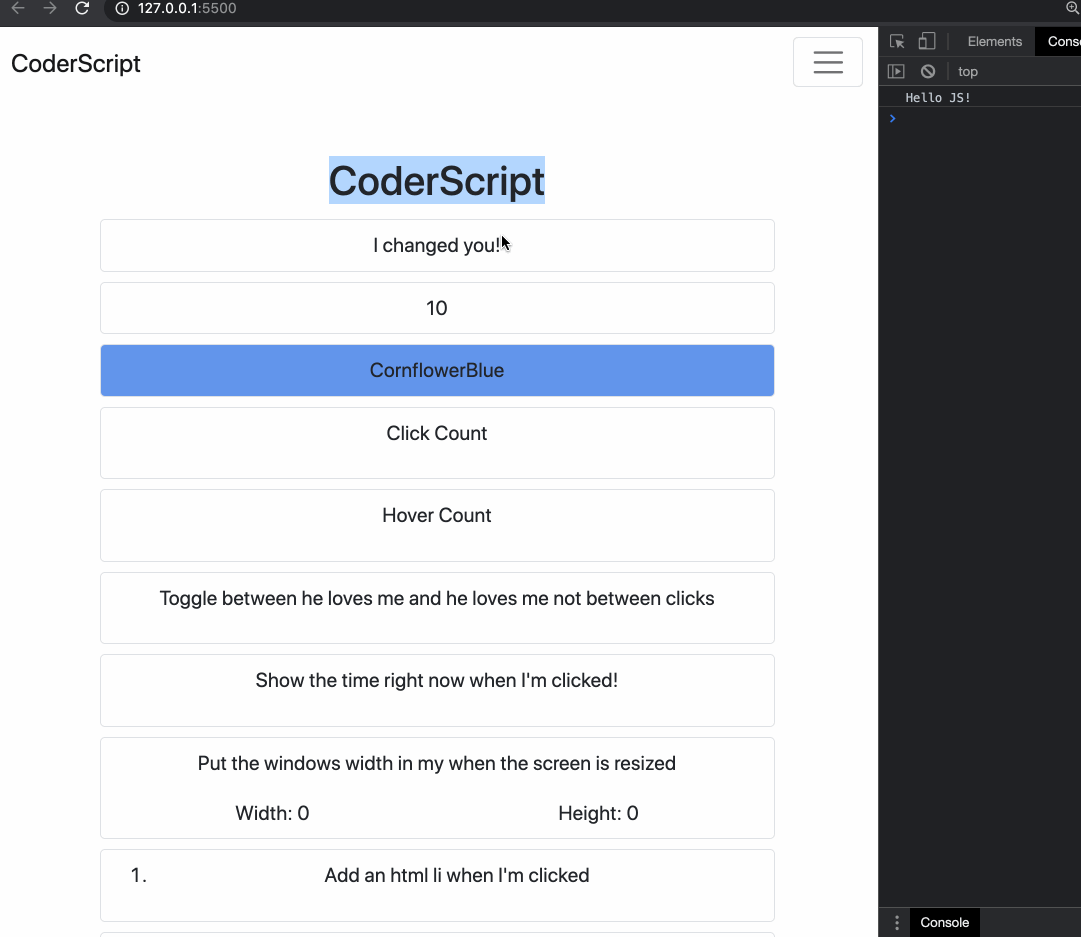
We'll do so by using our knowledge of D.O.M. methods.
Now work on these requirements one at a time moving down one box for every feature. Refer to lecture note and google to find the hint
- Change text in the first box 3 seconds after the page loads.
- Increment the count in the next box every second.
- Change the color & text inside the next box every 3 seconds.
- Increment the count in the next box when when clicked.
- Increment the count in the next box when when hovered.
- Switch between loves my and not loves me when the next box is clicked.
- Show the time inside the next box when clicked.
- Show the width & height of the next box when the window is resized.
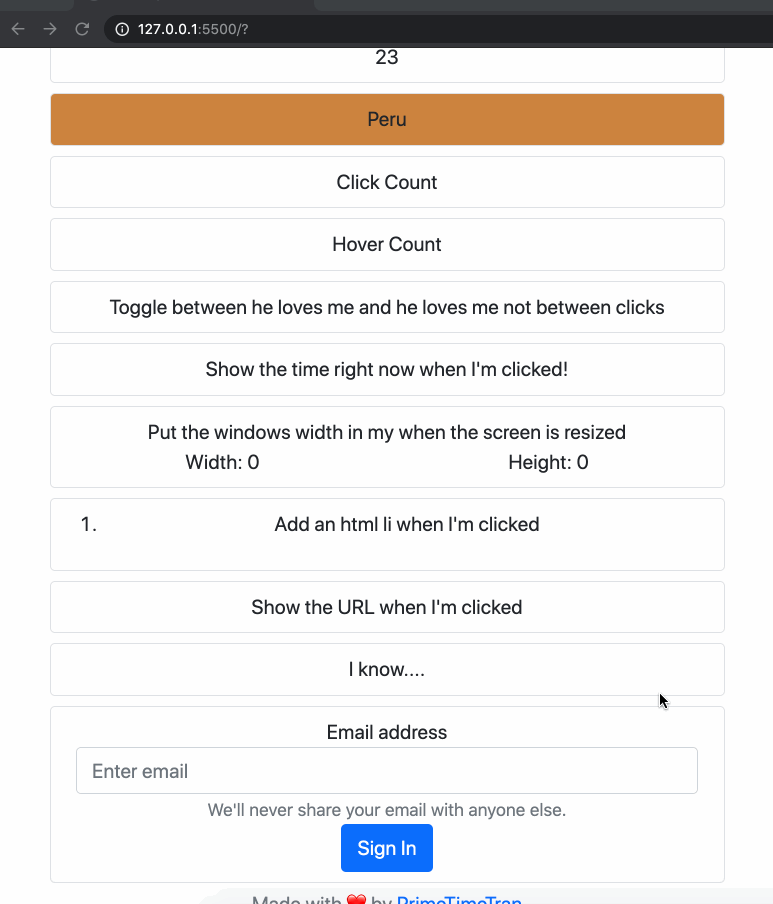
- Add a new li element that's numbered correctly when its clicked in the next box.
- Show the current URL of the webpage when the next box is clicked.
- Add some typewriteing when the next box is clicked.

- Add a signin form. Hide it when the signin button is clicked. Show a signout button when signed in. Hide the signout button when clicked & show the sign in form.
Requirement :
Create another box at the bottom that contain our Magic-8-Ball game
Instruction:
Previously we have built version 1.0 of Magic-8-Ball It's quite boring to just see "Yes" or "No" all the time. Let's add more possible results!
- Create 2 arrays of variations for "Yes" and "No". Feel free to add your own flavors.
const yes = ["Yes!", "Sure!", "Of course!"];
const no = ["No way!", "Never!", "Not a chance!"];
- Make a function to get a random item from an array.
function getRandomItem(arr) {
  //code here
}
Instead of changing the HTML text to "Yes" or "No", we change it to a random answer from the appropriate array. For example:
message.innerHTML = getRandomItem(yes);
Note: You can have just one array that holds both "yes" and "no" answers. However, by separating them into 2 arrays, we can have an equal chance of getting either result even if you have more "yes" answers than "no" answers (or the other way around).
- Add a third type of result: Maybe
- (🚀 Optional) Only show the result after a 4 second delay (hint: use
setTimeout()) - (🚀 Optional) Create a CSS rule for the class
flashingand add an animation that changes the background color to various colors (hint:@keyframesandanimation) - (🚀Optional) Add this
flashingclass to the main page just before the start of the 4 second delay, and remove it once the delay is over.
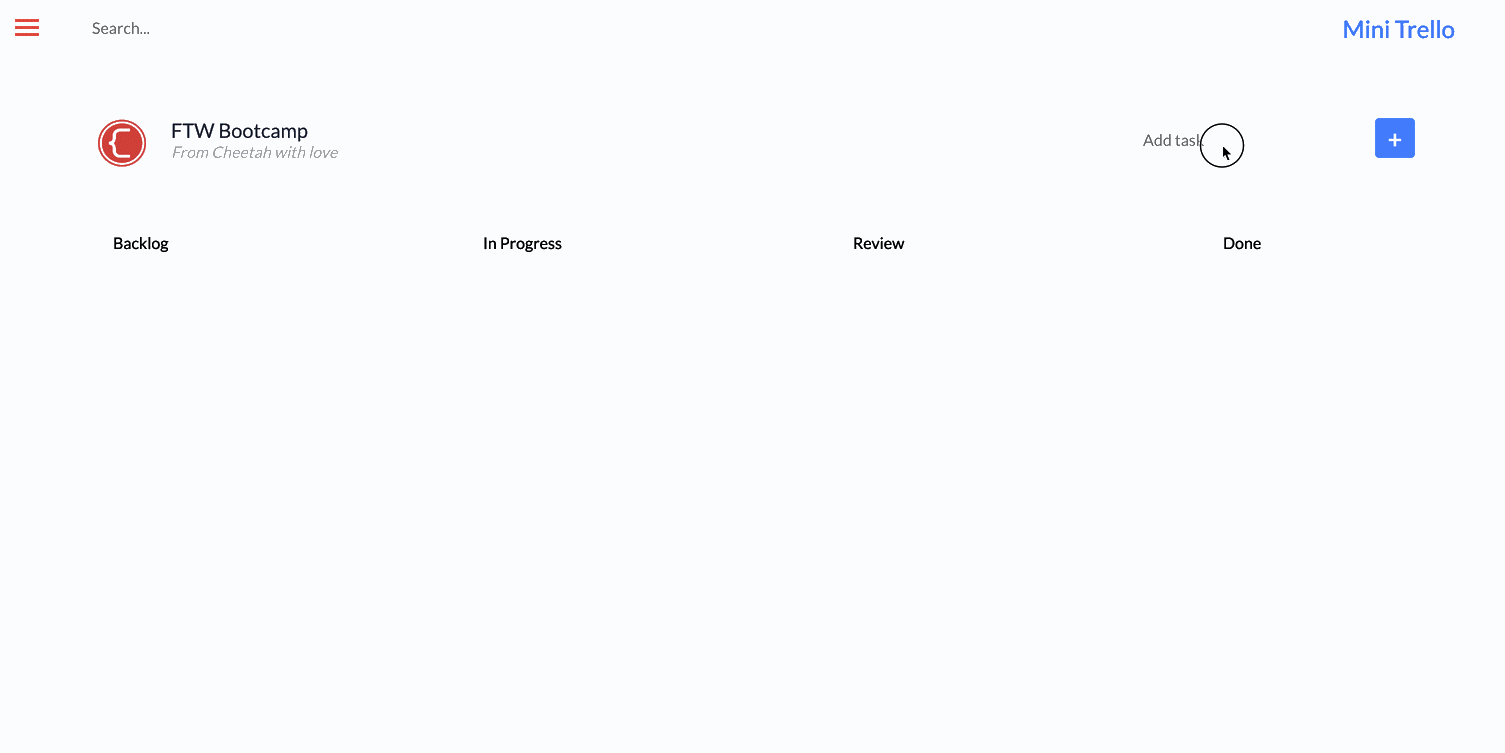
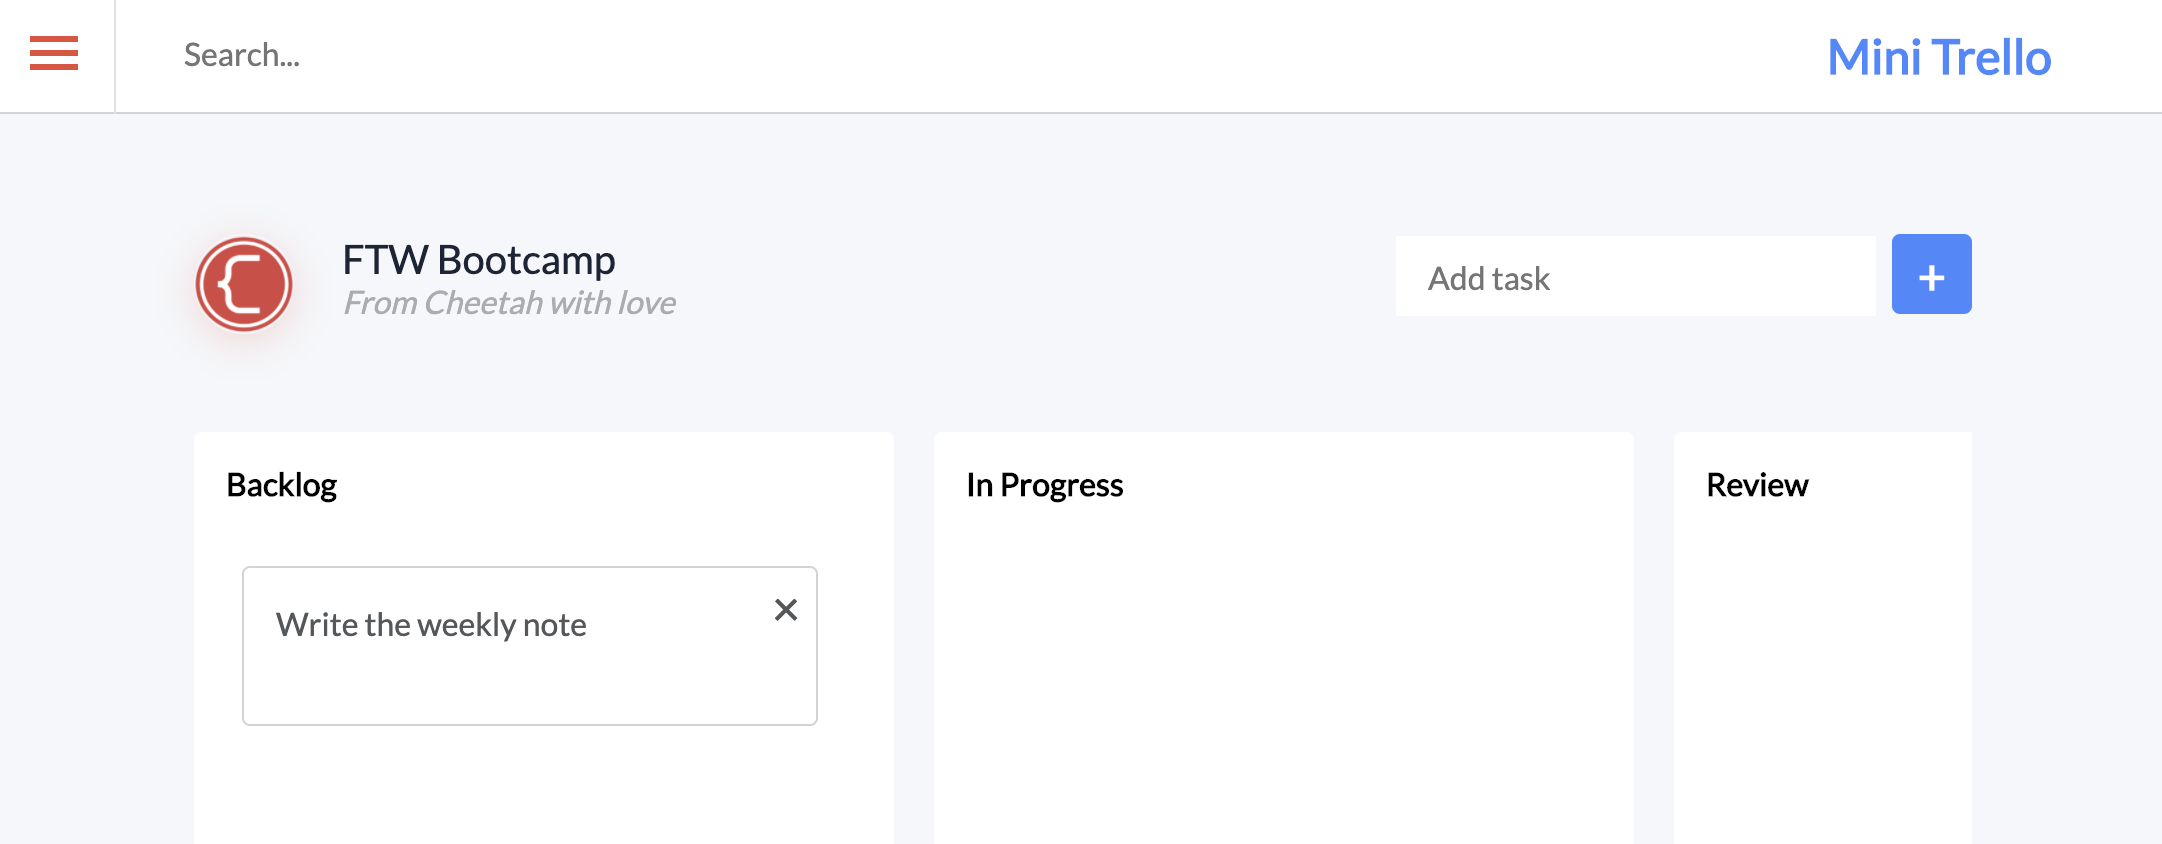
In this section of lab, you will build a Kanban board. A Kanban board is one of the tools that can be used to implement Kanban to manage work personally or at an organizational level. Kanban boards visually depict work at various stages of a process using cards to represent work items and columns representing each stage of the process. A viral Kanban-styled app is Trello.
Implementation
|-mini-trello/
    |- index.html
    |- style.css
    |- script.js
- Create 3 empty files like the structure above.
In index.html:
- Create the HTML boilerplate structure using the emmet abbreviation
html:5 - Change
titleto "Mini Trello" - Link to
style.cssusing the emmet abbreviationlink:css - Link to the javascript file by adding a
scripttag at the end of thebodyelement:
<script type="text/javascript" src="script.js"></script>
- Add Google fonts and Font awesome icons: put these
linktags in theheadtag, above your link tostyle.css
<link
  rel="stylesheet"
  href="https://pro.fontawesome.com/releases/v5.10.0/css/all.css"
  integrity="sha384-AYmEC3Yw5cVb3ZcuHtOA93w35dYTsvhLPVnYs9eStHfGJvOvKxVfELGroGkvsg+p"
  crossorigin="anonymous"
/>
<link
  href="https://fonts.googleapis.com/css?family=Lato|Roboto"
  rel="stylesheet"
/>
And that's all we need for this mini-project.
- In the
body, create aheader, and amain id="app" - In the
header, create anav id="navbar"
The navigation bar contains a burger icon, a search input box, and the title "Mini Trello":

- Put this HTML code inside the
nav id="navbar":
<div class="burger">
  <div class="line"></div>
  <div class="line"></div>
  <div class="line"></div>
</div>
<input id="search" placeholder="Search..." autocomplete="off" />
<h1 id="app-title">Mini Trello</h1>
In the main id="app", we'll create 2 section tags. The first one has id="board" and contains logo, descriptiton, and the form to add tasks. The second section in main contains the columns "Backlog", "In Progress", "Review", and "Done".
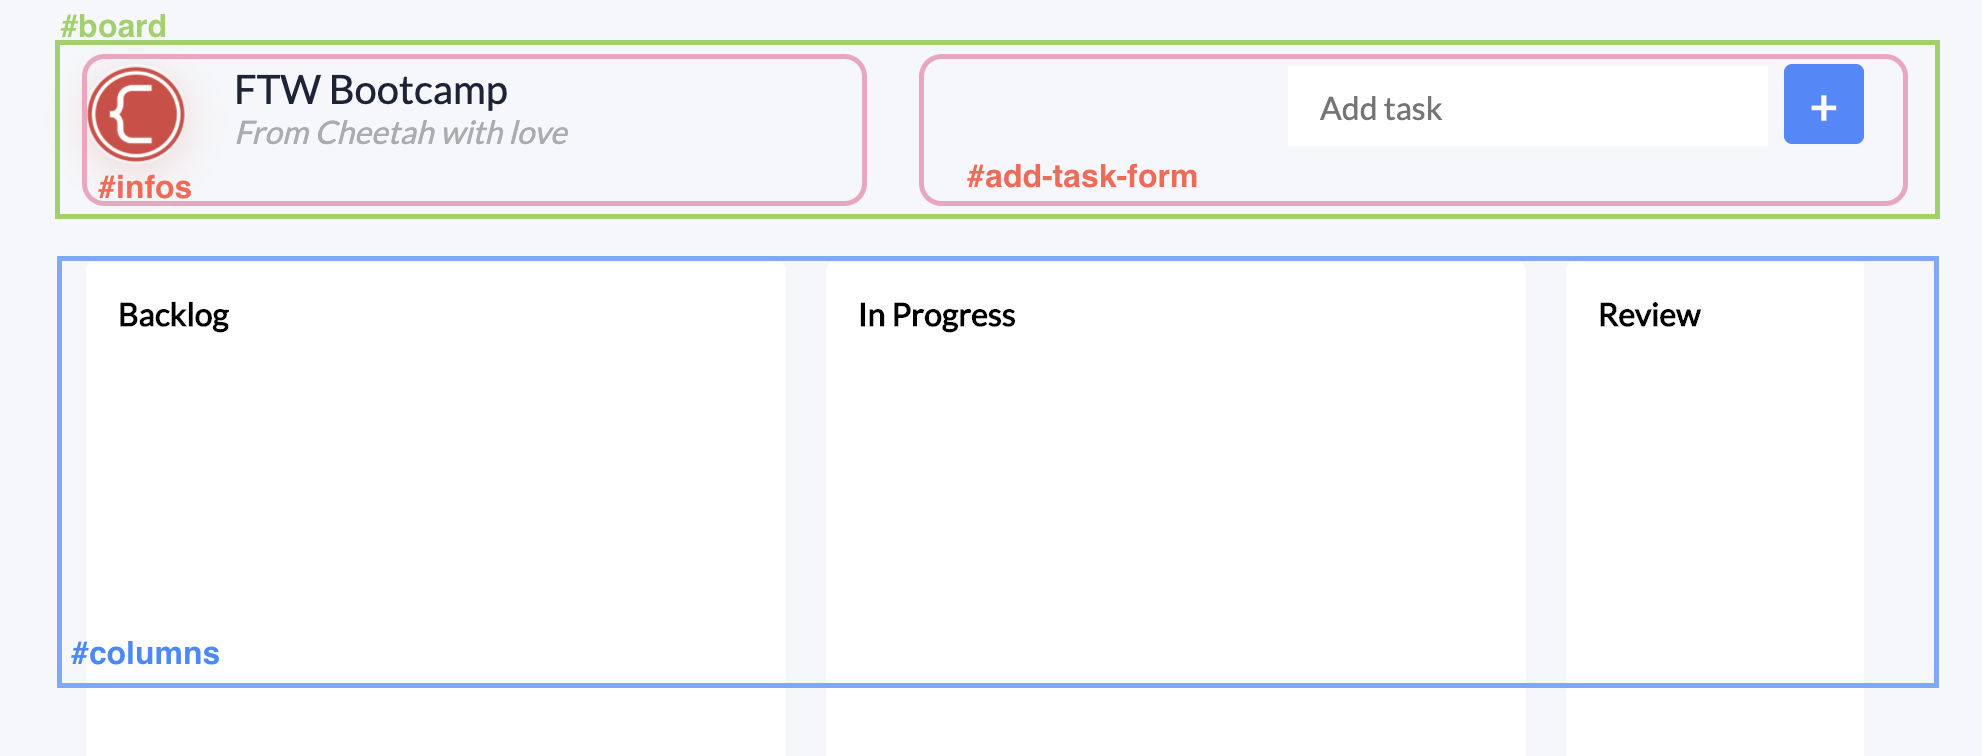
- Create
section id="board", andsection id="columns"in themain id="app" - Put this HTML markup in the
section id="board"
<div id="infos">
  <div class="logo"><img src="logo-12.png" alt="CS Logo" /></div>
  <div id="infos-content">
    <div class="infos-title">FTW Bootcamp</div>
    <div class="infos-description">From Cheetah with love</div>
  </div>
</div>
<div id="add-task-form">
  <input id="task-value" placeholder="Add task" />
  <button id="add-task">+</button>
</div>
- Put this HTML markup in the
section id="columns"
<div class="column dropzone">
<h3 class="column-title">Backlog</h3>
<ul class="tasks" id="tasks-added">
<li class="task fill" draggable="true">
<div class="task-content">Write the weekly note</div>
<div class="trash">×</div>
</li>
</ul>
</div>
<div class="column dropzone">
<h3 class="column-title">In Progress</h3>
<ul class="tasks"></ul>
</div>
<div class="column dropzone">
<h3 class="column-title">Review</h3>
<ul class="tasks"></ul>
</div>
<div class="column dropzone">
<h3 class="column-title">Done</h3>
<ul class="tasks"></ul>
</div>
We put a mockup/fake task "Write the weekly note" here to design CSS. We'll remove that li tag.
CSS is not the learning goal of this lab. However, I will quickly explain how the layout is structured here:
- The burger icon in the top left corner is made by 3
divwith background color red. - The
#navbaris a flex container. The search input inside thenavhasflex-grow: 1;to expand as much as it can and push the title "Mini Trello" to the right side. - The
section id="board"is a flex container with propertyflex-wrap: wrap;so that when the page is shrunk, the add new task form will jump to the next row. - The
section id="columns"contains 4 columns and is also a flex container. It has the propertyoverflow-x: auto;to add a scroll bar when the content overflows. Each column in this section is not allowed to grow or shrink viaflex: 0 0 auto;in.column {..} - The tasks are put in an
ulelement, and we use the propertylist-style-type: none;to remove the default style of an HTML unordered list.
Put this CSS code below in style.css:
:root {
  box-sizing: border-box;
}

*,
::before,
::after {
  box-sizing: inherit;
}

body {
  margin: 0;
  padding: 0;
  background-color: #f5f7fa;
}

header {
  display: flex;
  background-color: white;
  height: 60px;
  border-bottom: solid 1px lightgray;
}
#navbar {
  display: flex;
  align-items: center;
  flex: auto;
}
#navbar .burger {
  padding: 18px 18px;
  border-right: 0.5px solid #e0e2e5;
}
#navbar .burger .line {
  width: 24px;
  height: 3px;
  background-color: #e74c3c;
  margin: 4px 0;
}
#navbar #search {
  flex-grow: 1;
  margin-left: 32px;
  font-family: "Lato";
  font-size: 16px;
  border: none;
}
#navbar #search:focus {
  outline: 0;
}
#navbar #app-title {
  margin-top: 22px;
  margin-right: 60px;
  font-family: "Lato";
  font-style: normal;
  font-weight: bold;
  font-size: 24px;
  line-height: 29px;
  color: #4786ff;
}

#app {
  margin-left: 100px;
  margin-right: 100px;
}
#board {
  margin-top: 60px;
  display: flex;
  flex: auto;
  flex-wrap: wrap;
}
#infos {
  display: flex;
  flex-grow: 1;
  margin-bottom: 5px;
}
#infos img {
  width: 50px;
  height: 50px;
  box-shadow: 0px 4px 20px rgba(231, 76, 60, 0.2);
  border-radius: 50%;
}
#infos #infos-content {
  margin-left: 24px;
}
#infos .infos-title {
  font-family: "Lato";
  font-weight: 500;
  font-size: 20px;
  line-height: 24px;
  color: #1b2437;
}
#infos .infos-description {
  font-family: "Lato";
  font-style: italic;
  font-size: 16px;
  line-height: 19px;
  color: #aaacaf;
}

#add-task-form {
  display: flex;
}
#add-task-form #task-value {
  padding-left: 16px;
  margin-top: 1px;
  height: 40px;
  width: 240px;
  border-radius: 0px;
  margin-right: 8px;
  font-family: "Lato";
  font-size: 16px;
  line-height: 19px;
  border: none;
}
#add-task-form #task-value:focus {
  outline: 0;
  box-shadow: 0px 4px 20px rgba(52, 152, 219, 0.4);
}

#add-task-form #add-task {
  background: #4786ff;
  border: none;
  border-radius: 4px;
  width: 40px;
  height: 40px;
  font-family: Lato;
  font-weight: 900;
  font-size: 24px;
  line-height: 29px;
  color: #ffffff;
}
#add-task-form #add-task:focus {
  outline: 0;
}
#add-task-form #add-task:hover {
  box-shadow: 0px 4px 20px rgba(52, 152, 219, 0.4);
}
#columns {
  margin-top: 40px;
  display: flex;
  overflow-x: auto;
  -webkit-overflow-scrolling: touch;
}
.column {
  flex: 0 0 auto;
  width: 350px;
  height: 520px;
  background: white;
  border-radius: 4px;
  margin-left: 20px;
  background-color: white;
  overflow-y: auto;
  -webkit-overflow-scrolling: touch;
}
.column:first-child {
  margin-left: 0px;
}
.column:hover {
  border: 1px solid #4786ff;
  box-shadow: 0px 4px 20px rgba(52, 152, 219, 0.4);
}
.column-title {
  margin: 16px 0px 0px 16px;
  font-family: "Lato", Arial, Helvetica, sans-serif;
  font-weight: 600;
  font-size: 1em;
}
.tasks {
  padding: 0 24px;
}
.task {
  list-style-type: none;
  margin-top: 10px;
  position: relative;
  background-color: white;
  border: 1px solid lightgrey;
  border-radius: 4px;
  min-height: 80px;
  width: 288px;
}
.task:first-child {
  margin-top: 32px;
}
.task .task-content {
  margin: 16px 16px 0 16px;
  font-family: "Lato";
  font-weight: 400;
  font-size: 16px;
  line-height: 24px;
  color: #54585a;
}
.task:hover {
  background: #ffffff;
  border: 1px solid #4786ff;
  box-sizing: border-box;
  box-shadow: 0px 4px 20px rgba(52, 152, 219, 0.4);
  border-radius: 2px;
}
.task .trash {
  position: absolute;
  top: 5px;
  right: 8px;
  font-family: "Lato";
  font-size: 24px;
  color: #54585a;
}
.task .trash:hover {
  color: #e74c3c;
  cursor: pointer;
}
.hold:active:hover {
  border: solid 3px #4786ff;
}
.hovered {
  border-style: dashed;
}
.invisible {
  display: none;
}
- Expected output:
- Remove or comment out the mockup
li class="task fill" draggable="true"element
<!-- <li class="task fill" draggable="true">
<div class="task-content">Write the weekly note</div>
<div class="trash">×</div>
</li> -->
User can add a new task
When user clicks the Add button, we will take three actions:
- Get the content of the
input id="task-value" - If the value is not empty, we'll invoke a function called
addTask(taskValue)which will add a newlielement in the list Backlog. - After that, we will remove the text in
input id="task-value"to be ready for adding the next task.
Add this code in script.js:
document.getElementById("add-task").addEventListener("click", function () {
  var taskInput = document.getElementById("task-value");
  alert("User entered: " + taskInput.value);
  taskInput.value = "";
});
- Type something in the "Add task" input and click the Add button. We expect to see an alert window that shows whatever you have typed in.
- Replace
alert(taskValue);withaddTask(taskValue);in theifstatement. Now we work on theaddTask()function:
function addTask(taskValue) {
  var task = document.createElement("li");
  task.classList.add("task");
  task.classList.add("fill");
  task.setAttribute("draggable", "true");
  task.addEventListener("dragstart", dragStart);
  task.addEventListener("dragend", dragEnd);

  var taskContent = document.createElement("div");
  taskContent.classList.add("task-content");
  taskContent.innerText = taskValue;

  var trash = document.createElement("div");
  trash.classList.add("trash");
  trash.innerHTML = "×";
  trash.addEventListener("click", removeTask);

  task.appendChild(taskContent);
  task.appendChild(trash);

  var tasks = document.getElementById("tasks-added");
  tasks.insertBefore(task, tasks.childNodes[0]);
}
This is basically the code to generate an li element which contains the task value and a remove button "X". The li element's structure is the same as the mockup li element we have removed in the previous step.
There is something new here though:
task.addEventListener("dragstart", dragStart);
task.addEventListener("dragend", dragEnd);
// ...
trash.addEventListener("click", removeTask);
dragStart and dragEnd are two event handler functions that we need to add to the li element to react when user drag and drop the element to another column.
removeTask is another event handler that will remove the task if the ‘click' event of the "X" button happens.
Implement the event handlers:
function removeTask(event) {
  // event represents the remove button
  // Access the <ul> list by moving 2 levels up
  var tasks = event.target.parentNode.parentNode;
  // Access the <li> element which is the direct parent
  var task = event.target.parentNode;
  tasks.removeChild(task);
}

// DRAG & DROP

// A global variable to store the selected task
var task;

function dragStart(event) {
  event.target.classList.add("hold");
  task = event.target;
  setTimeout(function () {
    event.target.classList.add("invisible");
  }, 0);
}

function dragEnd(event) {
  event.target.classList.remove("invisible");
}
Evaluation
Type something in the Add Task input and click the Add button. You should see the task appears in the Backlog column. You can drag & drop it, but nothing happens for now.
You can click on the remove button to delete the task.
User can drag and drop the task to another column
Put this code in script.js:
function dragEnter(event) {
  if (event.target.classList.contains("dropzone")) {
    event.target.classList.add("hovered");
  }
}

function dragOver(event) {
  event.preventDefault(); // https://stackoverflow.com/a/35428657
}

function dragLeave(event) {
  event.target.classList.remove("hovered");
}

function dragDrop(event) {
  event.target.classList.remove("hovered");
  // event represents the column
  // Add the task to the right child. Inspect the element to find the ul is index 3 in childnodes.
  event.target.childNodes[3].append(task);
}

var dropzones = document.getElementsByClassName("dropzone");

for (var index = 0; index < dropzones.length; index++) {
  const dropzone = dropzones[index];
  dropzone.addEventListener("dragenter", dragEnter);
  dropzone.addEventListener("dragover", dragOver);
  dropzone.addEventListener("dragleave", dragLeave);
  dropzone.addEventListener("drop", dragDrop);
}
The variable dropzones contains all elements that have been assigned to the class dropzone. Those elements are actually the columns Backlog, In Progress, Review, and Done.
The for loop adds the event handler functions dragEnter, dragOver, dragLeave, dragDrop to all columns.
The dragenter event is fired when a dragged task enters a column. When the event is fired, we change the column's border-style to dashed by adding the class hovered to the column element.
The dragleave event is fired when a dragged task leaves a column. We will remove the class hovered to bring the border of the column back to normal.
The drop event is fired when a dragged task is dropped on a column. When the event is fired, we add the task element (stored in the variable task) to the column's ul element.
And that's it. Good job!
Now it's your turn. Let's implement your own features to the app. Use this list below as suggestions. Feel free to go beyond it:
- Add a Fontawesome icon to replace the "X" of the remove button.
- Make the Add Task input to accept pressing Enter on the keyboard as a confirmation (the same behavior like click the Add button). Ref: MDN KeyboardEvent.key
- Allow users to edit the task in the column. Hint: add an edit button/icon (similar to the remove button). When user clicks the button, replace the task value text with an input box. After user types something and hit Enter to confirm, remove the input box with the new task value.
- Add buttons/icons that move the task to specific columns automatically.
- And any other awesome ideas that you have. –>