What You'll Learn
- How to send Emails
- How to respond to actions in emails
Additional Reading
- Mailgun - an email service that offers an API to send email.
- Mailgun Walkthrough)
- Go to Mailgun website and sign up. You will need to verify your email using SMS. If you have problem with not receiving the text, please try and use another phone number if possible. You can sign up without a credit card; you just won't be able to email very many people.
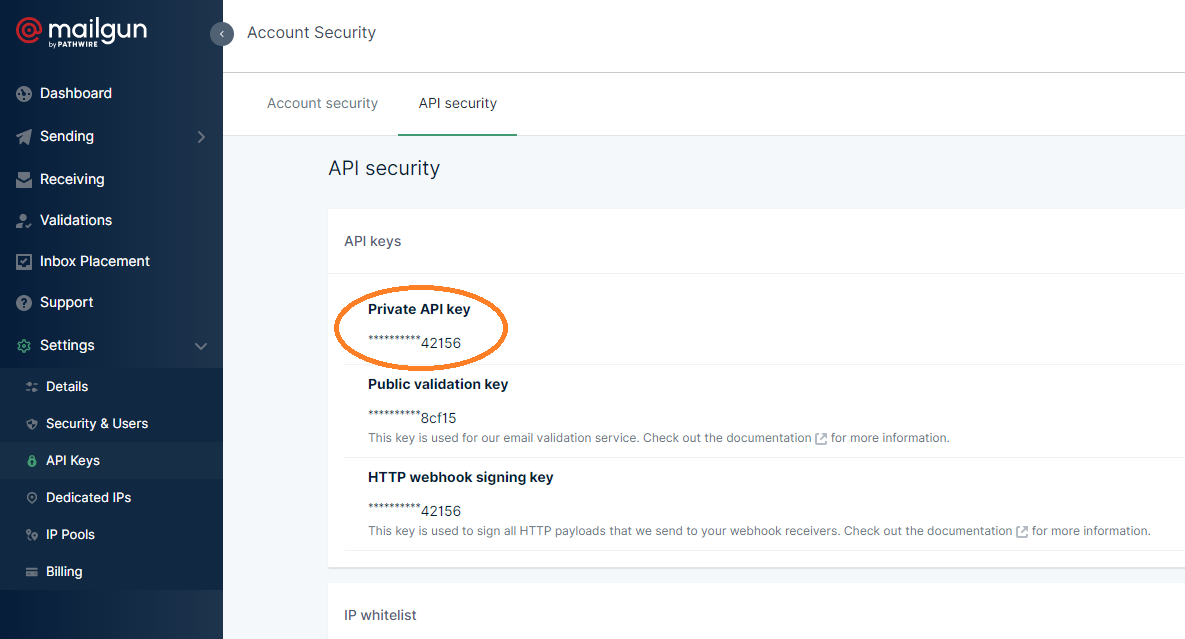
There are 2 values you need to note down from your Mailgun account: The API KEY and the DOMAIN.
- Go to your dashboard, under Settings, choose API Keys. Copy the
Private API keyand store it somewhere.
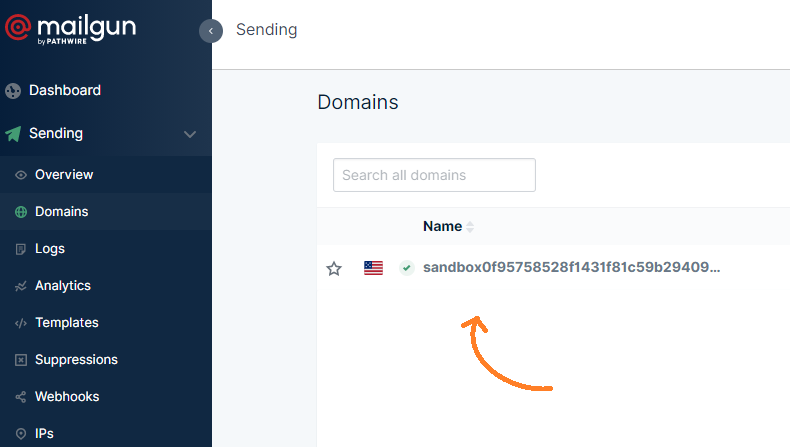
From your dashboard, choose Sending and then click on Domains. Click the sandbox... link.
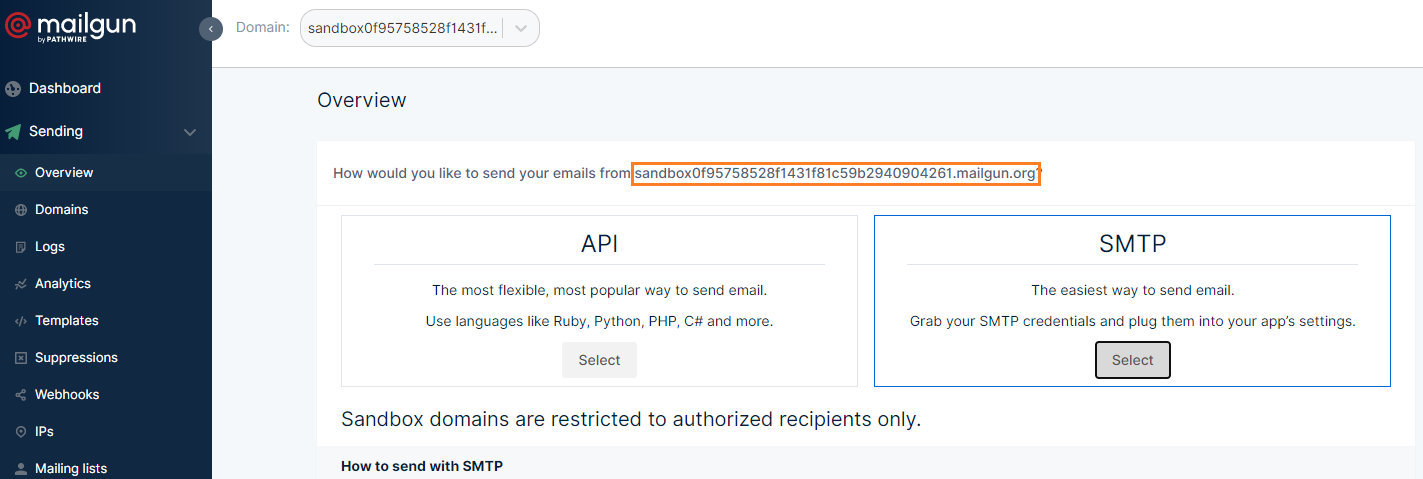
- Copy the full name of the sandbox. This is your domain name. This means that your emails will be sent from this domain, for example,
testing@sandboxa5bbe83ae04f4473a8c23b05ad2e9c9a.mailgun.org.
- If you signed up without a credit card, then you can only send emails to up to 5 recipients, and you need to add them to your list first. Add your primary email address (or a test one that you have access to) to this list on the right side of the page:
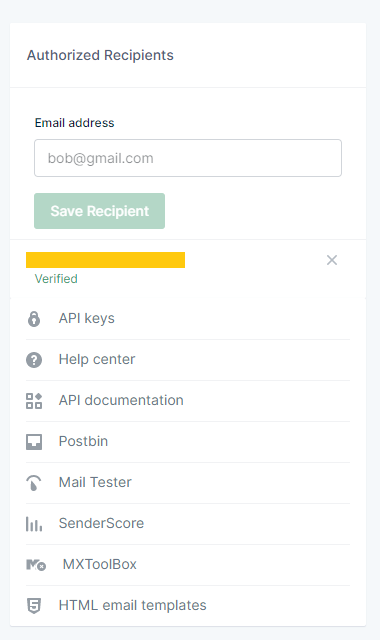
- You will also need to sign into your mailbox and verify the email address.
Let's create a new express app, as usual:
npx express-generator --no-view
Install our normal dev tool, dotenv:
npm install dotenv
Install mailgun:
npm i mailgun-js
Create a .env file, create some variables MAILGUN_API_KEY and MAILGUN_DOMAIN and use the values you got from the previous step. Hook this up to app.js with the standard require('dotenv').config();.
You can see your Mailgun Private API key here: https://app.mailgun.com/app/account/security/api_keys
Then create a helpers/email.js:
const mailgun = require("mailgun-js");
const DOMAIN = process.env.MAILGUN_DOMAIN;
const mg = mailgun({ apiKey: process.env.MAILGUN_API_KEY, domain: DOMAIN });

const sendTestEmail = () => {
	const data = {
		from: "Mailgun Sandbox <postmaster@sandboxf892f174a178454399ad3b7e895c0a13.mailgun.org>",
		to: "--YOUR EMAIL ADDRESS--",
		subject: "Hello",
		text: "Testing some Mailgun awesomeness!"
	};
	mg.messages().send(data, function (error, body) {
		console.log(body);
	});
};

module.exports = {
	sendTestEmail
};
If you are wondering how to come up with all of these codes, read mailgun-js documentations.
Now in routes/index.js, import the emailHelper, and then add:
/* Temporary GET route to send myself an email. */
router.get("/test-email", (req, res) => {
  email.sendTestEmail();
  res.send("email sent");
});
Great! Now you can send a basic email. Trigger the email by either postman'ing or just opening a browser to localhost:3000/test-email.
You should see an email in your inbox! If not, check your spam folder.
We need to create a template. For that, we will create new model to save our template
- Create Model : models/template.js
const mongoose = require("mongoose");
const Schema = mongoose.Schema;

const templateSchema = Schema(
  {
    name: { type: String, required: true },
    description: { type: String, required: true },
    template_key: { type: String, required: true, unique: true },
    from: { type: String, required: true },
    html: { type: String, required: true },
    subject: { type: String, required: true },
    variables: [{ type: String, required: true }],
  },
  {
    timestamp: true,
  }
);

const Template = mongoose.model("Template", templateSchema);
module.exports = Template;
- Make the email helper function to create the new template data helpers/email.js
const mailgun = require("mailgun-js");
require("dotenv").config();
const Template = require("../models/Template");
const mg = mailgun({
  apiKey: process.env.MAILGUN_API_KEY,
  domain: process.env.MAILGUN_DOMAIN,
});
const emailHelper = {};
const emailInternalHelper = {};

emailInternalHelper.createTemplatesIfNotExists = async () => {
  try {
    let template = await Template.findOne({ template_key: "verify_email" });
    if (!template) {
      await Template.create({
        name: "Verify Email Template",
        template_key: "verify_email",
        description: "This template is used when user register a new email",
        from: "CoderSchool Team <social_blog@mg.coderschool.vn>",
        subject: "Hi %name%, welcome to CoderSchool!",
        variables: ["name", "code"],
        html: `Hi <strong>%name%</strong> ,
          <br /> <br />
          Thank you for your registration.
          <br /> <br />
          Please confirm your email address by clicking on the link below.
          <br /> <br />
          %code%
          <br /> <br />
          If you face any difficulty during the sign-up, do get in
          touch with our Support team: apply@coderschool.vn
          <br /> <br /> Always be learning!
          <br /> CoderSchool Team
          `,
      });
    }
  } catch (err) {
    console.log(error);
  }
};

module.exports = { emailInternalHelper };
- Call this
createTemplatesIfNotExistsfunction when you connect to mongo DB app.js
mongoose
  .connect(mongoURI, {
    // some options to deal with deprecated warning
    useCreateIndex: true,
    useNewUrlParser: true,
    useFindAndModify: false,
    useUnifiedTopology: true,
  })
  .then(() => {
    console.log(`Mongoose connected to ${mongoURI}`);
    emailInternalHelper.createTemplatesIfNotExists();
  })
  .catch((err) => console.log(err));
- To support email verification, we'll have to add a few fields to our
Userschema. The two fields are:
emailVerificationCode- String type, that will be the "secret" code to verify a user.emailVerified- Boolean type, that checks if the user has been validated or not. Optionally, you could also save this as a timestamp, and name itemailVerifiedAt.
Add these two fields, and now we'll create middleware around them.
- Create the function to send email ** helpers/email.js **
emailHelper.renderEmailTemplate = async (
  template_key,
  variablesObj,
  toEmail
) => {
  const template = await Template.findOne({ template_key });
  if (!template) {
    return { error: "Invalid Template Key" };
  }
  const data = {
    from: template.from,
    to: toEmail,
    subject: template.subject,
    html: template.html,
  };
  for (let index = 0; index < template.variables.length; index++) {
    let key = template.variables[index];
    if (!variablesObj[key]) {
      return {
        error: `Invalid variable key: Missing ${template.variables[index]}`,
      };
    }
    let re = new RegExp(`%${key}%`, "g");
    data.subject = data.subject.replace(re, variablesObj[key]);
    data.html = data.html.replace(re, variablesObj[key]);
  }
  return data;
};
emailHelper.send = (data) => {
  mg.messages().send(data, function (error, info) {
    if (error) {
      console.log(error);
    }
    console.log(info);
  });
};

module.exports = { emailHelper, emailInternalHelper };
- Send email when user register controllers/userController.js
 const emailVerificationCode = utilsHelper.generateRandomHexString(20); // you need to create this helper
    user = await User.create({
      name,
      email,
      password,
      avatarUrl,
      emailVerificationCode,
      emailVerified: false,
    });

    const verificationURL = `${FRONTEND_URL}/verify/${emailVerificationCode}`;
    const emailData = await emailHelper.renderEmailTemplate(
      "verify_email",
      { name, code: verificationURL },
      email
    );

    if (!emailData.error) {
      emailHelper.send(emailData);
    } else {
      throw new Error("Create email fail");
    }
When you make email, you need to create email verify code. In order to make this code we will use some library call crypto
- Create
helpers/utils.js npm install crypto- Make function to generate random hex string.
utilsHelper.generateRandomHexString = (len) => {
  return crypto
    .randomBytes(Math.ceil(len / 2))
    .toString("hex") // convert to hexadecimal format
    .slice(0, len)
    .toUpperCase(); // return required number of characters
};
Now you can TEST!! Register new user! you will get the EMAIL
In the email, we link to the frontend with the URL that includes the verification code in the query. Now we need to make a page for that link. When someone visits that page, you will take the verification code and send it to your backend in the body of your POST request so that the backend and do something with it.
- Create a React App and set up React Router and redux (you can refer to previous projects).
- Create and Link to your
VerifyEmailPagecomponent.
<Route path="/verify" component={VerifyEmailPage} />
There are a few ways to get the query from the URL. Using URLSearchParams is one of them.
- In your
VerifyEmailPage.js, create a custom hookuseQuery():
import { useLocation } from "react-router-dom";

function useQuery() {
	return new URLSearchParams(useLocation().search);
}
- In the same component, get the value of the query
code:
const VerifyEmailPage = () => {
	const query = useQuery();
	const codeQuery = query.get("code");
	console.log("Your code is:", codeQuery);
	return <div>This is the Email Verification Page.</div>;
};
- Test your frontend on a browser to see if it works. If you go to this link http://localhost:3000/verify?code=abc, the console should log out
Your code is: abc. - Now that you have the verification code, send it to the backend in the body of a POST request.
const verifyEmail = async () => {
	const url = `/users/verify_email`;
	const response = await api.post(url, { code });
	console.log(response);
};
useEffect(() => {
	verifyEmail();
}, []);
- Test and see if everything is working as expected.
- Now that everything is running smoothly, refactor your code and implement redux. Instead of running
verifyEmail()that was defined here, you will rundispatch()and call a user action in your actions folder.
dispatch(usersActions.verifyEmail());
The action would be something similar to this:
const verifyEmail = (code) => async (dispatch) => {
	dispatch({ type: types.VERIFY_EMAIL_REQUEST, payload: null });
	try {
		const res = await api.post("/users/verify_email", { code });
		dispatch({ type: types.VERIFY_EMAIL_SUCCESS, payload: res.user });
	} catch (error) {
		dispatch({ type: types.VERIFY_EMAIL_FAILURE, payload: error });
	}
};
Now we need to use the code sent back the frontend. We need to:
- Find the user by email verification code.
- Set verified to
true. - Generate and attach an access token to the response.
- Clear the verification code.
In users.controller.js:
const verifyEmail = async (req, res, next) => {
	const { code } = req.body;
	let user = await User.findOne({
		emailVerificationCode: code
	});
	if (!user) {
		res.status(400).json({ error: "Invalid Email Verification Token" });
		return;
	}
	user = await User.findByIdAndUpdate(
		user._id,
		{
			$set: { emailVerified: true },
			$unset: { emailVerificationCode: 1 }
		},
		{ new: true }
	);
	token = await user.generateToken();
	res.json({ user, token });
};
Add the route to your users.js routes:
router.post("/verify_email", usersController.verifyEmail);
Test and see if it works.
Now that the server sends back a token, your frontend will automatically log the user in after they come and successfully verify their email. This will improve the user experience! To do this, go to your frontend project.
In your frontend project
In the axios file, with every request, axios will intercept and add the token from localStorage to the headers.
const token = localStorage.getItem("token");
if (token) {
	request.headers["Authorization"] = "Bearer " + token;
}
With every response from the server, axios will intercept and check if token exists in the response. If it does, then it will be set to localStorage.
if (response.token) {
	localStorage.setItem("token", response.token);
}
That's it! Now you can apply this to your previous projects!